The BEST At Home Back Workout For Growth (NO EQUIPMENT)
You can build a big back with no equipment! In this article, I'll show you the best at home back workout you can do to grow your back muscles.
Familiar with home workouts? Then you already know that the back is probably the most difficult muscle to adequately train at home without equipment. And this is especially so when you don’t even have a pull-up bar. Of course, there are plenty of back workouts at home out there that do “target” the back muscles to a certain degree. But they aren't exactly the best at home workout you can do. That's because they either fail to:
- Actually work your back muscles through their full range of motion
OR
- They just don’t provide enough load or resistance to enable you to actually build muscle in your back without using heavy weights
Here though, I’ll go through a home back workout that avoids those two common pitfalls. And will instead enable you to target and grow your various back muscles in the comfort of your own home.
Before that: if you're looking for a training program that'll help you set up every single one of your home workouts for optimal muscle growth (not just for the back, but for ALL muscle groups!), I've got just the thing for you. Every BWS program is designed to be an all-in-one, science-based process that’ll get you to your dream physique FAST. And best of all? It's all rooted in science. For more information:
Click the button below to take my analysis quiz to discover the best program for you:
↓
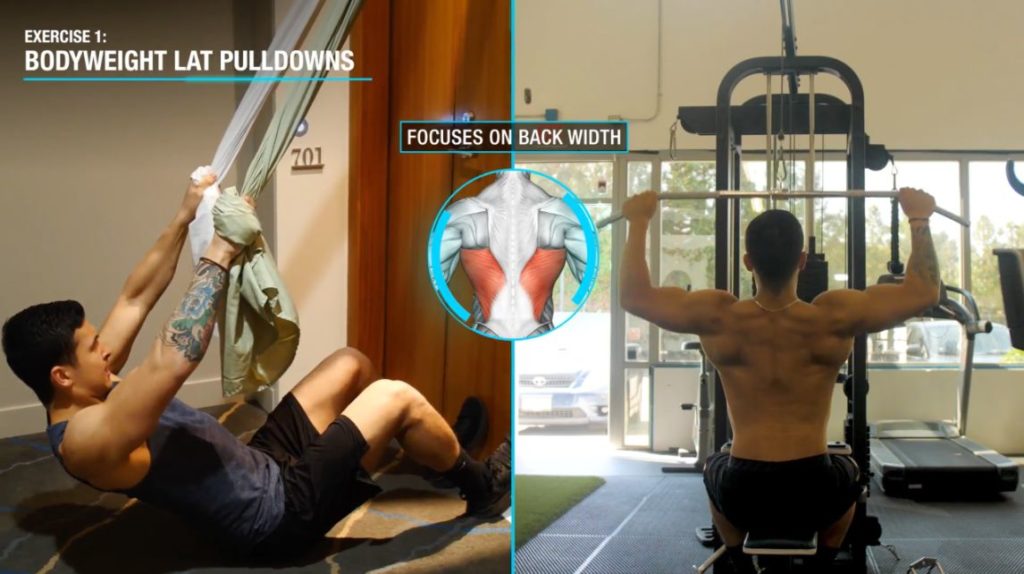
Exercise 1: Bodyweight Lat Pulldowns
Replaces: Pull-ups or lat pulldowns
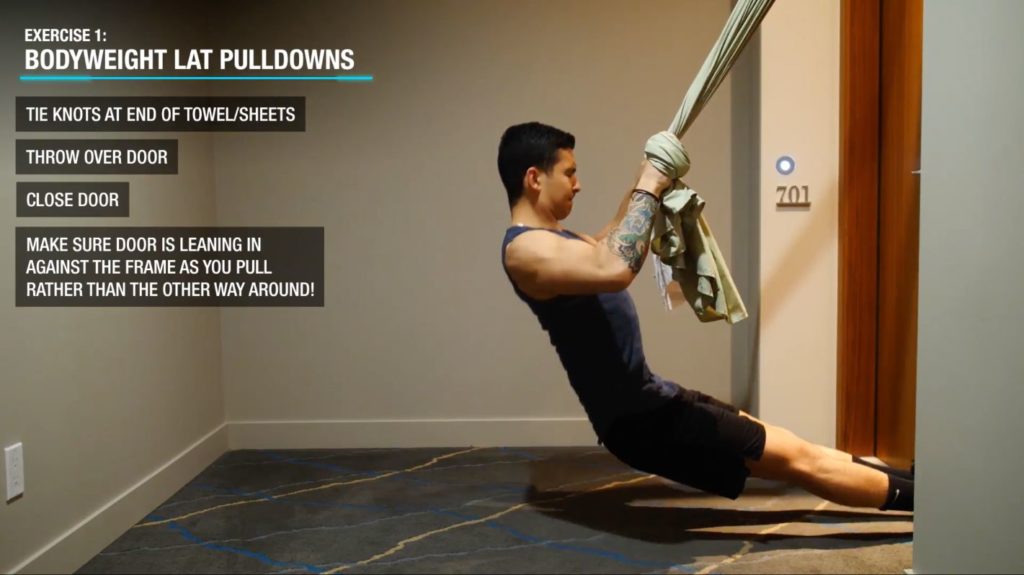
To target your lats most effectively, you ideally want to use the bed sheet setup I’ve presented in my other home workouts (here and here). You'll have to:
- Tie a knot at the end of two long bed sheets
- Throw them over your door
- Close the door inwards
And this will then create a home version of the TRX. I highly suggest that you at least try this setup. We’ll be using it quite a bit in this back workout. But just make sure that when you close the door, close it so that the door leans in against the frame as you’re pulling. Instead of the other way around. As this will enable it to hold strong as you perform your exercises.
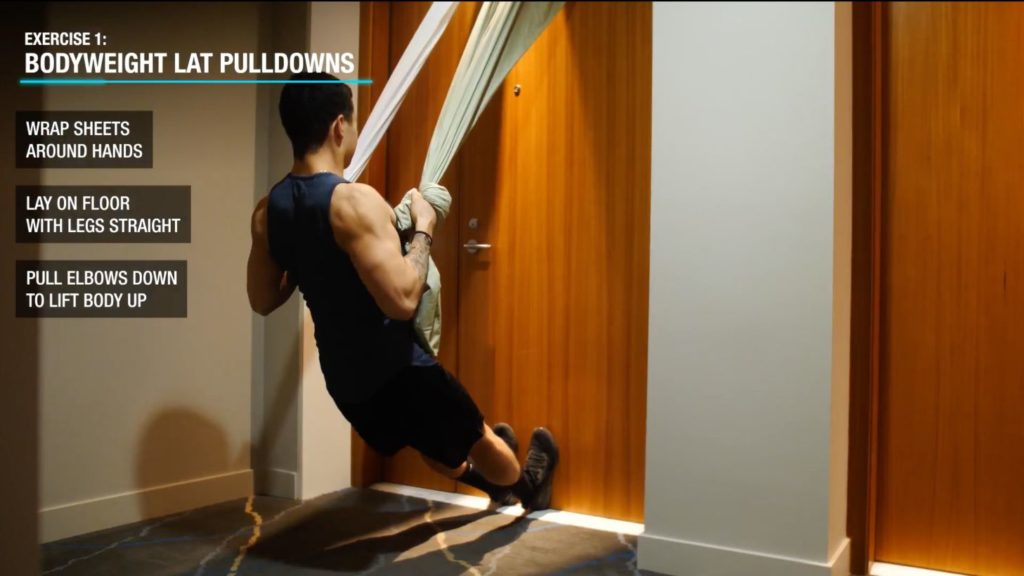
Once you have that setup ready, we’ll perform bodyweight lat pulldowns with it:
- Wrap the sheets around your hands
- Lay on the floor with your legs straight
- And pull your elbows down and back to lift your body off of the ground. This is just as you would in a pull-up or lat pulldown.
- Then, use your lats to control your body back down to the ground and repeat
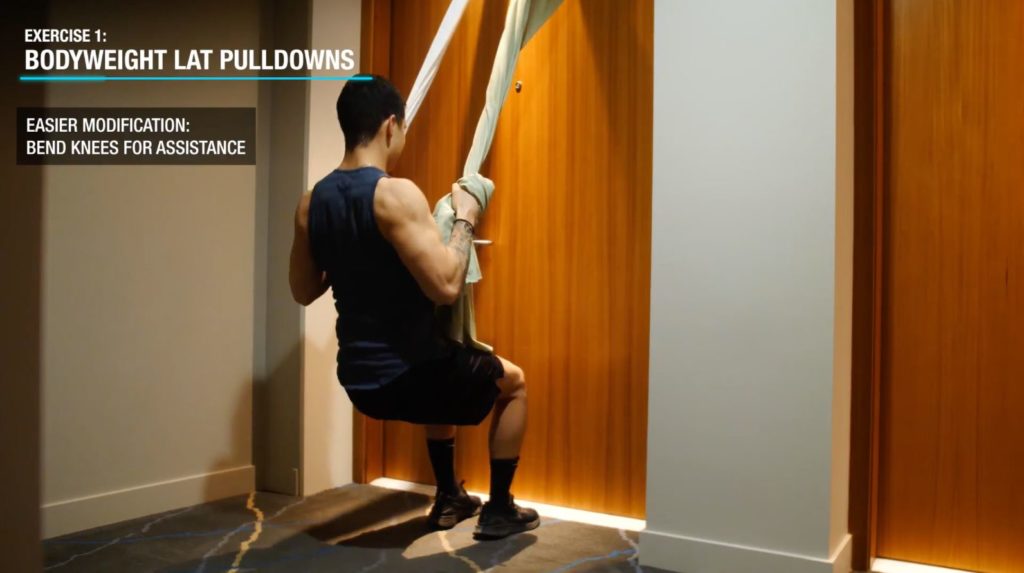
If these are too difficult, you can regress them by bending your knees and then using your legs to help push you up during each rep. Then, over time you can use your legs less and less by gradually straightening them. Do so until they’re completely straight and your upper body is doing all of the work.
The Sliding Lat Pulldowns Are A Viable Alternative
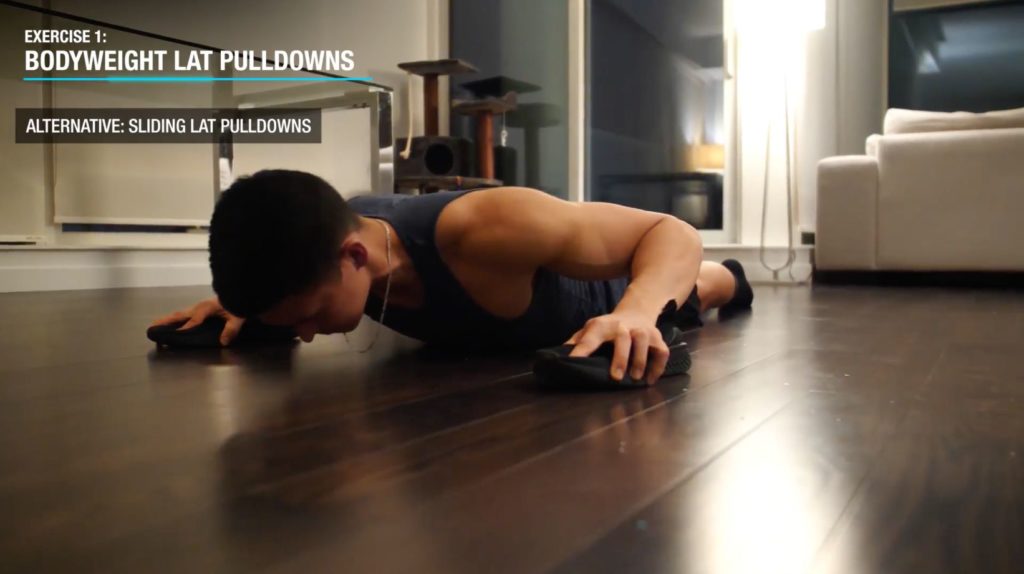
But what if you aren’t using the bed sheet set up? An alternative is something I’ve shown in my past home workout article: the sliding lat pulldown:
- Lay on a smooth surface
- Hold onto something for grip on your hands, like shoes, for example
- Then, you simply perform a lat pulldown motion by pulling your elbows down to slide your body upwards by using your lats.
Unfortunately, this does eliminate the all-important eccentric portion of the movement when compared to the bed sheet lat pulldowns. But is still nonetheless a viable alternative.
Exercise 2: Bodyweight Row
Replaces: Mid-back rows
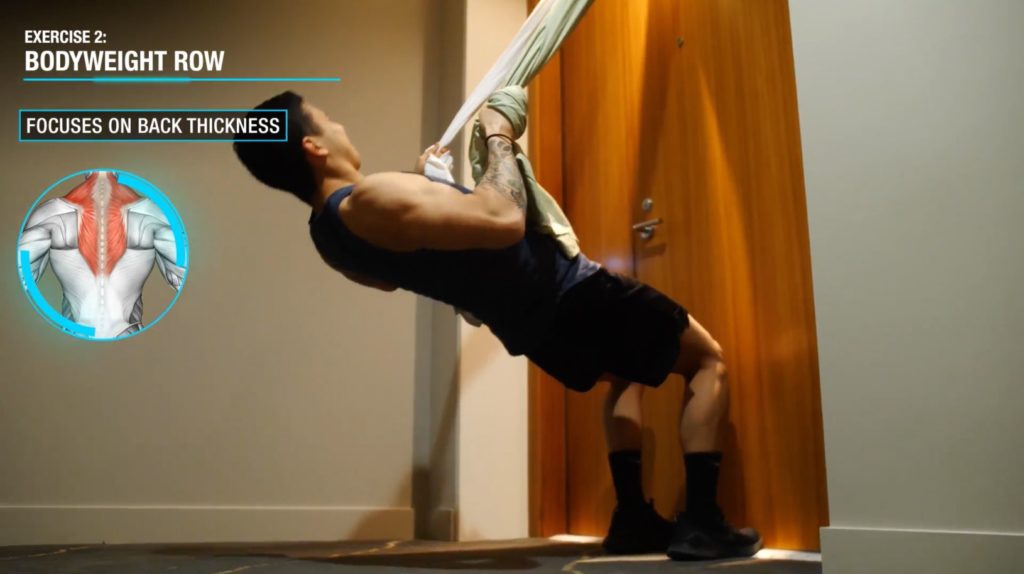
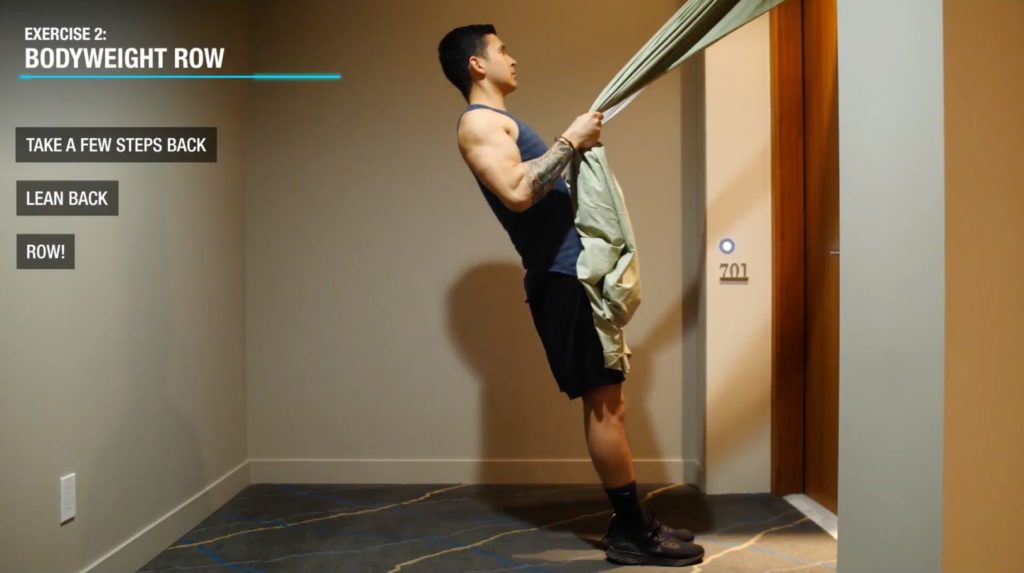
Next, we’re going to move onto a bodyweight row. Doing so helps shift a little more emphasis on our mid-back musculature. This includes the mid-traps and rhomboids, which allows for more back thickness. For these, we’ll go back to the inverted row setup:
- Grab each sheet
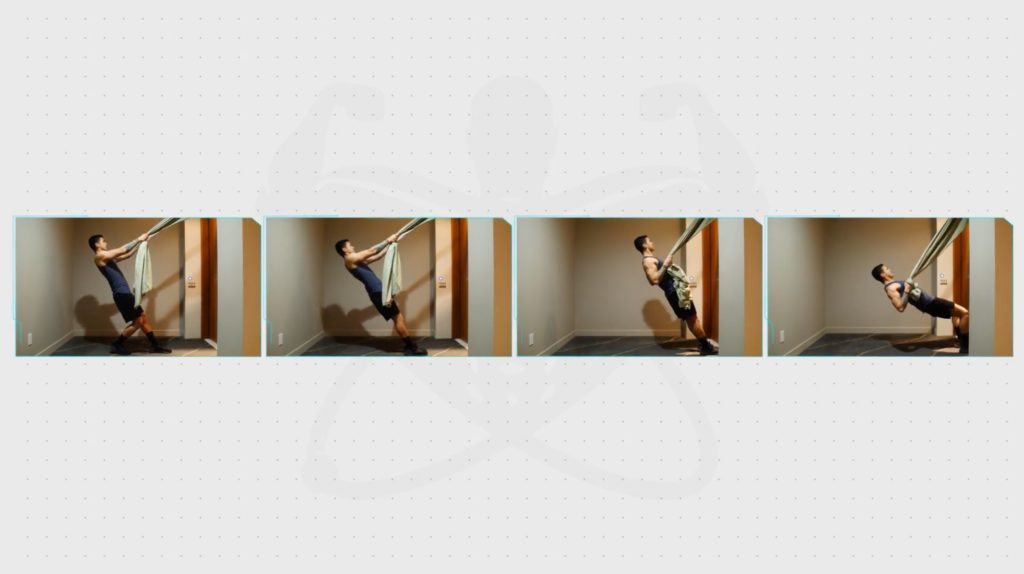
- Take a few steps back and lean back until there’s tension in the sheets
- And then pull yourself upwards by driving your elbows back and squeezing your shoulder blades together
For the easiest modification, you can perform these with a split stance. And use your back leg to help raise your body up during each rep. Then, move onto doing these with your feet together. Then from there, you can continue moving your feet closer and closer to the door in order to make movement more difficult. The more horizontal you position your body, the more load you’ll be lifting. Which is a great way to effectively progress this exercise without weights.
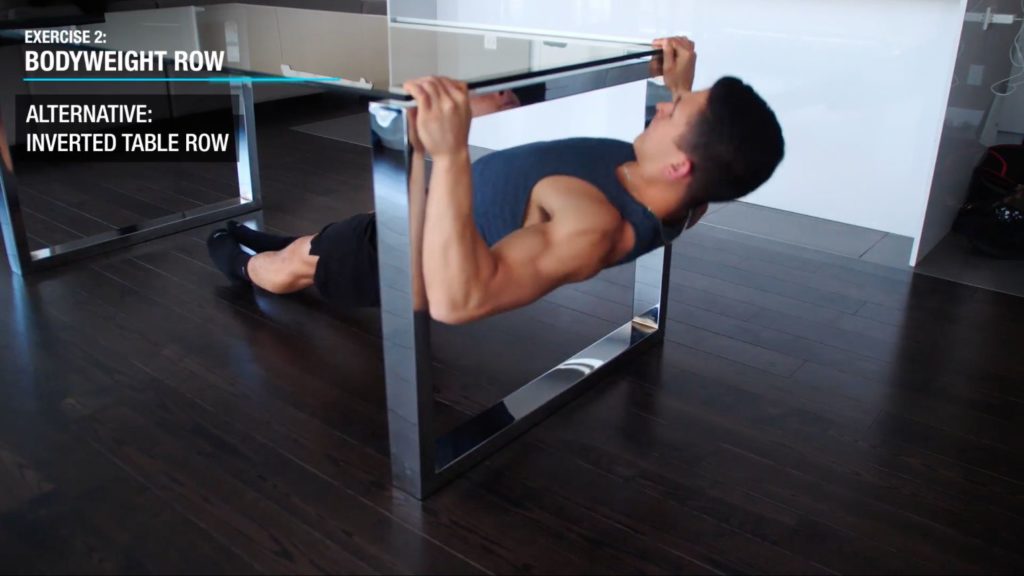
If you’re not using the sheets though, then ideally you’ll want to find a table sturdy and long enough to safely perform your row. Which can be made easier by bending your knees and using your legs for assistance. Then as you get stronger, straighten your knees and gradually make your body more horizontal. Doing so helps increase the load of your bodyweight you’ll be lifting.
Exercise 3: Straight Arm Pulldown
Replaces: Dumbbell pullover/ straight arm pulldown
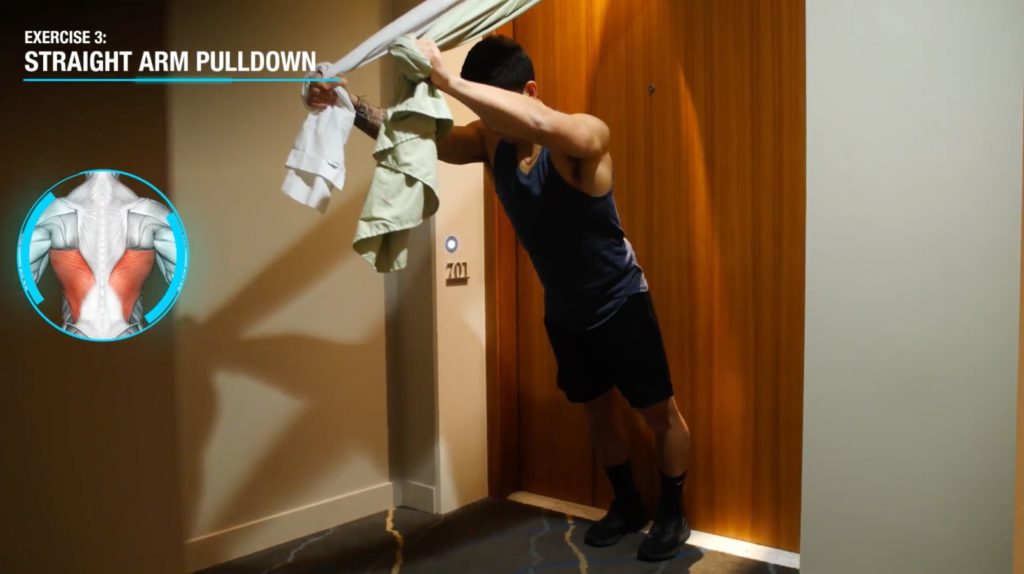
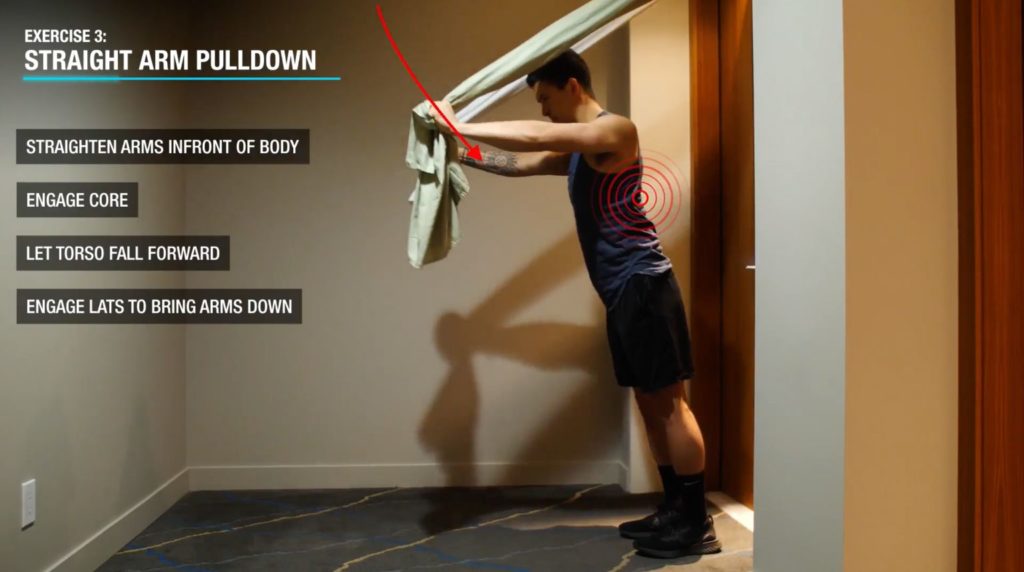
Next, we’re going to move back to targeting the lats for more back width. And we’ll use the sheets here again. For these:
- Wrap the sheets around your hands
- Straighten your arms in front of your body
- Engage your core
- Let your body fall forward as you let your arms raise overhead
- Then, bring your body back up to the starting position by driving your arms downward by engaging your lats.
Note that your torso and arms should remain straight the whole time. And you want to think about driving your elbows backward to best engage the lats as you raise your body up.
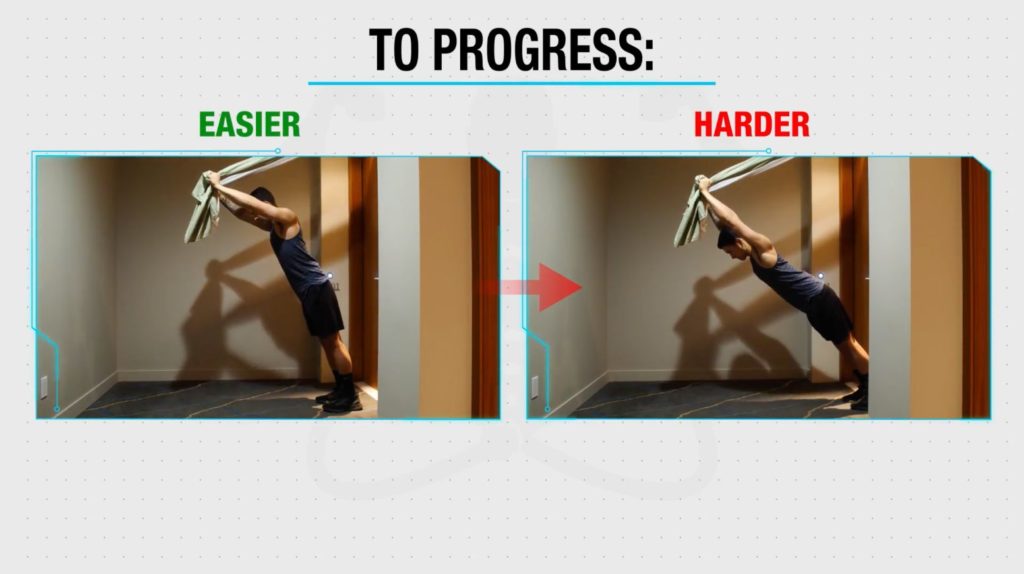
To start out, I’d recommend doing these with your feet further away from the door. so that your body doesn’t fall forward as much as this will be the easiest regression. Then, as you get stronger, move your feet closer towards the door to enable your body to fall forward more. You can also shorten the range of motion to make it easier when starting out. And then gradually increase the range of motion by letting your arms travel further overhead.
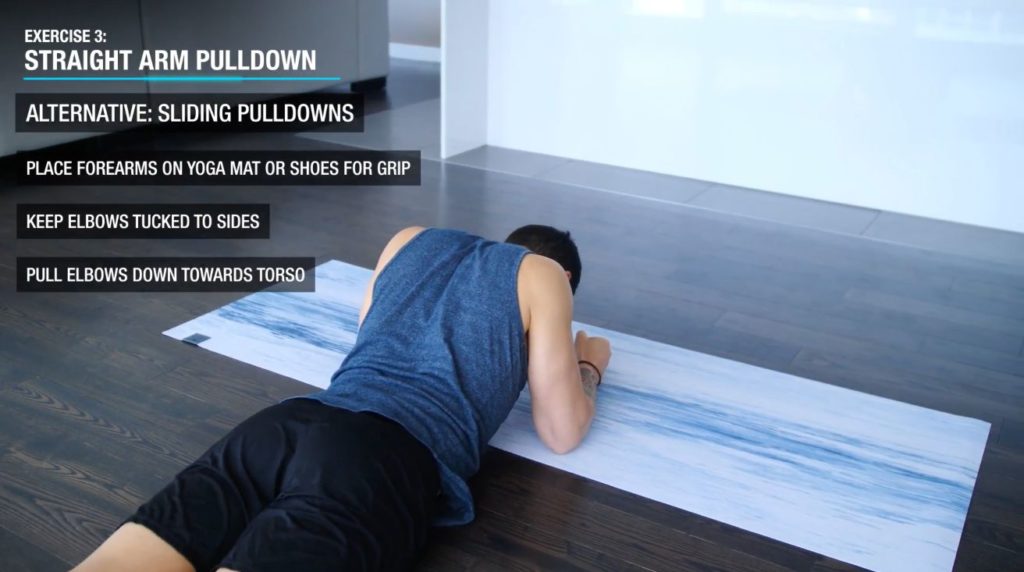
An alternative if you’re not using sheets though is to perform a sliding version of these on the ground. Here, you’ll want to:
- Place your forearms on something that can grip the floor like a yoga mat or even shoes
- Then, while keeping your elbows tucked close to your sides, you want to simply drive your elbows down towards your torso to slide your body
This exercise is quite similar to the sliding lat pulldowns done earlier. But by keeping your elbows tucked close to your body, you’ll be able to target the lats effectively through a slightly different angle.
Exercise 4: Bed Sheet Face Pulls
Replaces: Cable face pulls
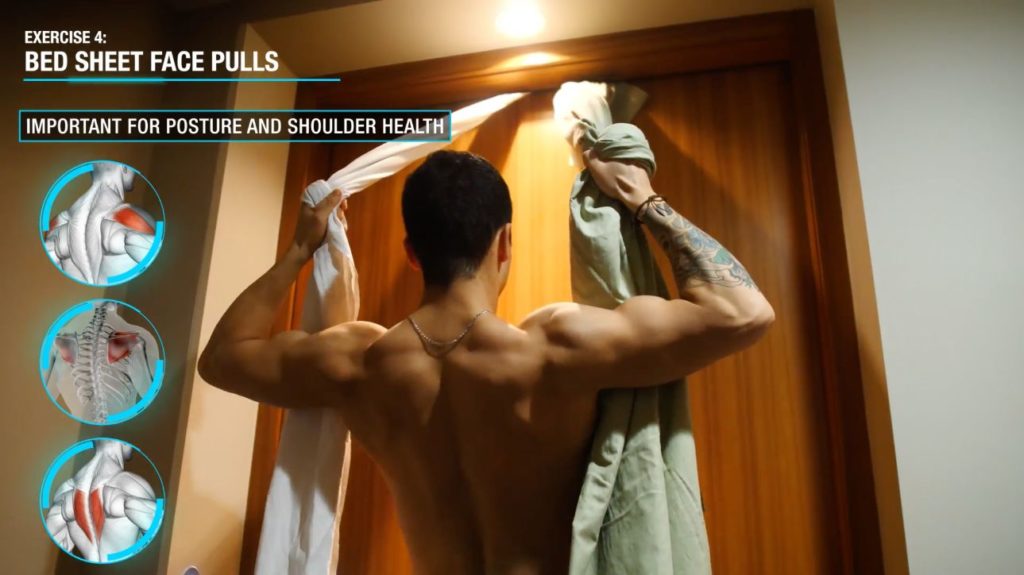
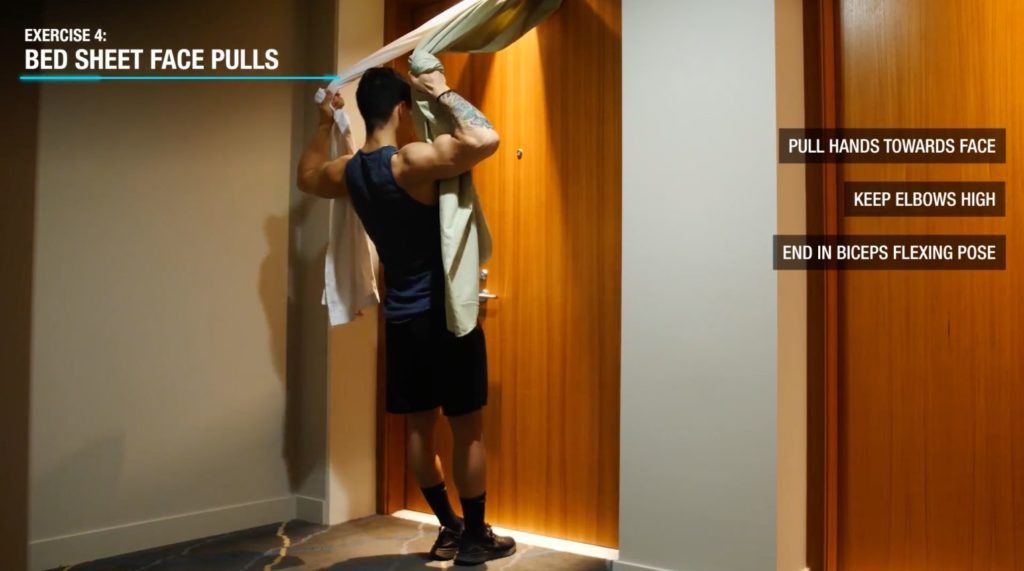
Next, we’re going to use the sheets to now perform face pulls. This helps to target the mid and lower traps. As well as the various rotator cuff muscles that are all important muscles for postural improvements and overall scapula and shoulder stability. For these:
- Wrap your hands around the sheets
- Take a few steps back from the door
- Lean back until there’s tension in the sheets
- Then, raise your torso up by performing a face pull. Pull your hands towards your face while keeping your elbows high and externally rotating your shoulder such that your arms are in a biceps flexing pose at the end position.
You should feel this exercise in the middle of your back and in the back of your shoulders.
To start out, you can perform these with a split stance to use your back leg for assistance. Then, as you get stronger you can perform them with your feet together. And gradually move your feet closer and closer to the door to continue increasing the difficulty over time.
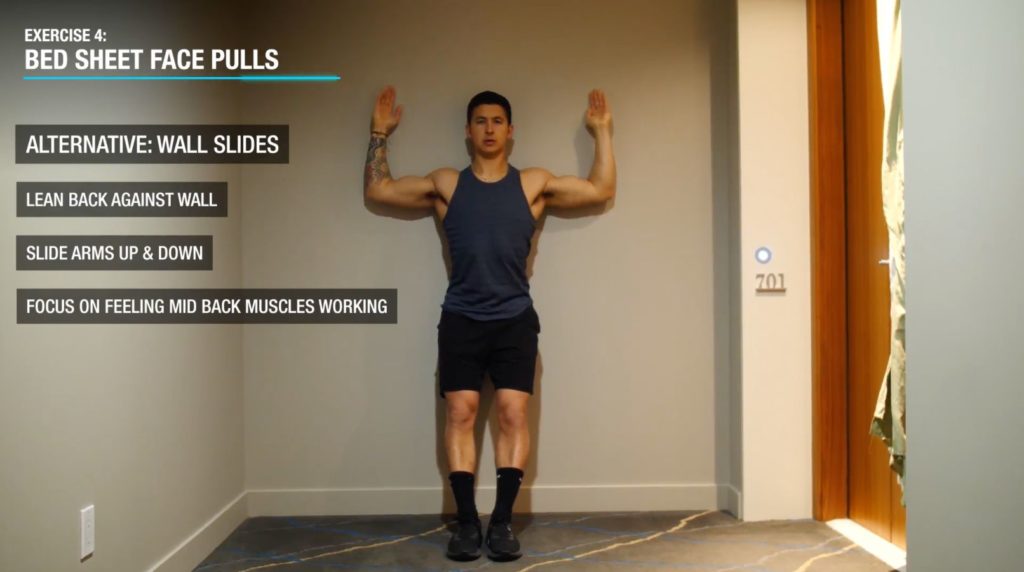
But what if you aren’t using the sheet setup? To hit some of these important muscles you can perform wall slides instead. Where you lean your back against a wall and slide your arms up and down against it mimicking a shoulder press movement pattern. When done properly you should feel these light up your mid-back muscles.
Knowing how to tweak/replace exercises that suit your training goals is pretty complicated - especially when you have limited access to equipment. Thankfully, though, the team here at BWS has the necessary expertise to do just that. Our 3-on-1 coaching program takes the guesswork out of training, nutrition, and even mobility work - so you can focus on what matters: making gains. If you're interested:
Click the button below to find out more about the 3-on-1 coaching program:
↓
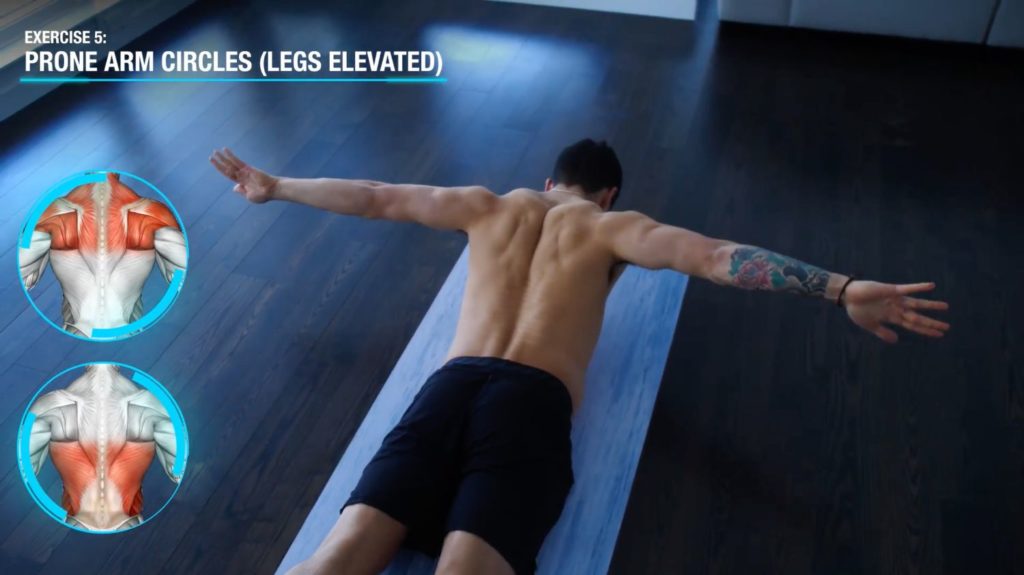
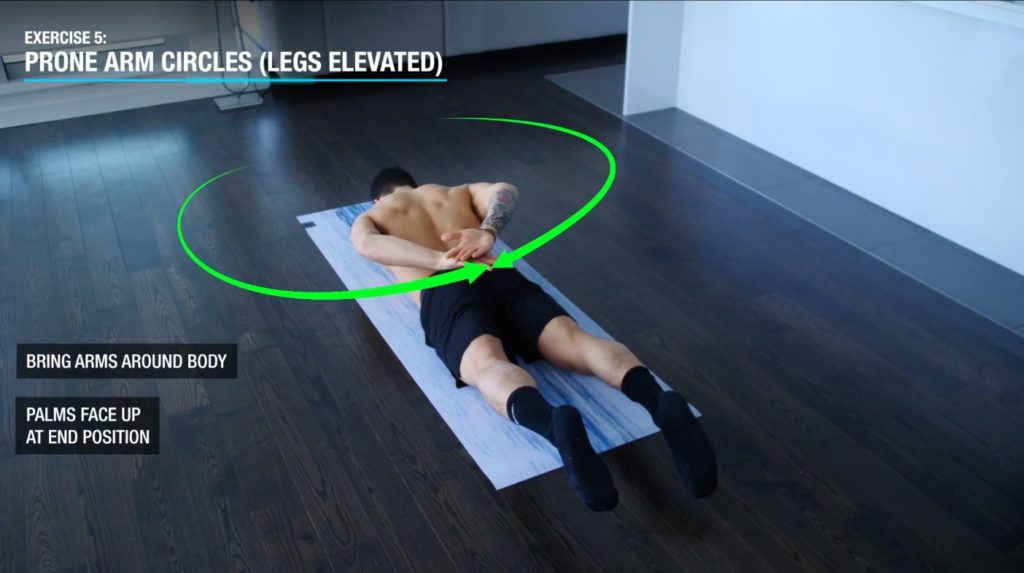
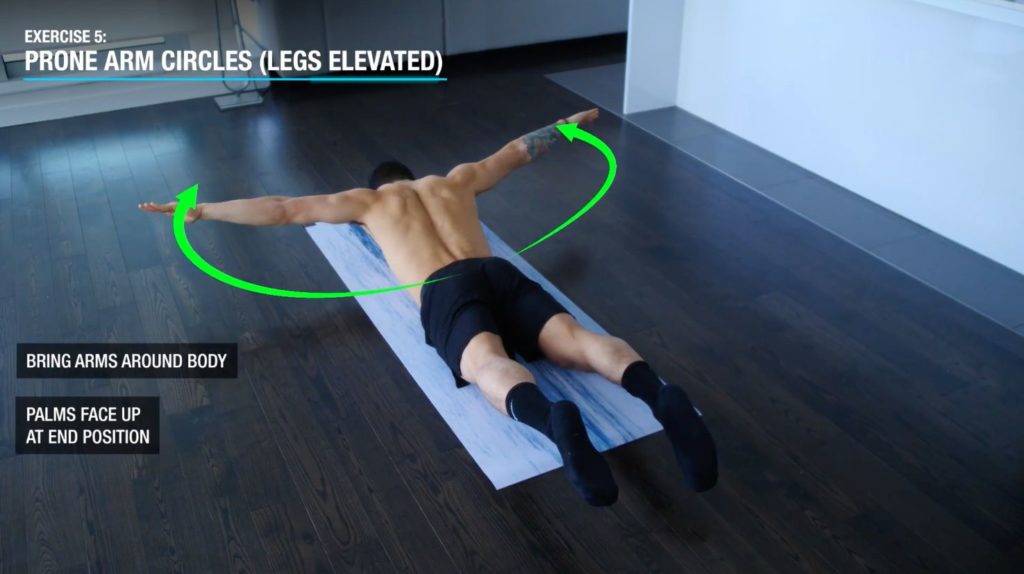
Exercise 5: Prone Arm Circles (Legs Elevated)
Next, we’re going to finish the at home workout off with a move that’ll enable us to not only work all of our upper back muscles but will now target and strengthen the lower back through hip extension as well. For these:
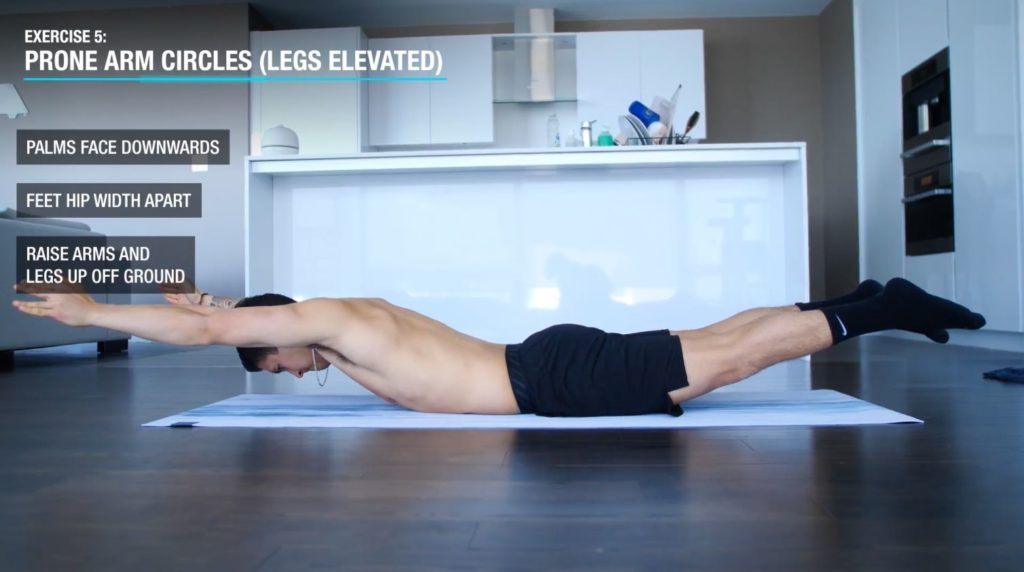
- Lay on your stomach with your arms and legs extended. Your palms should face downwards and your feet should be about hip-width apart.
- Then, raise your arms and legs up off the floor by about an inch or two. Try to get your chest and thighs up off the ground if you can. From this alone you should already feel your glutes, lower back, and mid back all highly engaged.
- From here, you want to slowly bring your arms out to your sides. Then, all the way behind your back while twisting them such that your palms now face upwards when they reach your back.
- Slowly move them back to the starting position for one complete rep. And you can take a break for a few seconds before performing your next rep.
What if it's too difficult for you? I’d recommend raising your legs and upper body to a lesser degree and performing the arm circle movement faster. Then, over time you can progress by raising your legs and upper body a little more while slowing down the tempo of your arm circles.
Best At Home Back Workout: Action Plan
So to sum the article up here’s what your home back workout could look like:
Home Back Workout
Bodyweight Lat Pulldowns: 3 sets
Bodyweight Inverted Row: 3 sets
Straight Arm Pulldown: 3 sets
Bed Sheet Face Pulls: 3 sets
Prone Arm Circles: 3 sets
This CAN be performed as a back workout on its own. But I’d recommend instead splitting it up into at least 2 days throughout the week by using an upper/lower split, for example. Because doing so will help better manage the training volume and frequency.
And ideally you want to use a rep range of roughly 10-15 reps per set. But as I’ve explained in my other home workout articles, worry less about the rep range. Instead, focus on taking each set of the workout either to failure or within a rep or two short of failure. This maximizes growth despite you not having access to heavy weights.
And then, once you can perform more than roughly 30 reps per set in any of the exercises, you want to then progress to a harder variation that I provided for each movement in order to continue maximizing growth overtime.
How To Workout Your Back At Home: Takeaway
But by executing and progressing this workout properly over time as you get stronger, you’ll be able to build your back in the comfort of your own home. Without the need for heavy weights. Just keep in mind though that this is just one piece of the puzzle. Because pairing your workouts with the right nutrition plan is essential when it comes to seeing results and packing on size.
And for a step-by-step science-based program that takes care of all the guesswork for you by showing you both how to workout AND what to eat week after week in order to build muscle as efficiently as possible with science:
Click the button below to take my analysis quiz to discover the best program for you:
↓
I hope you enjoyed this full back workout article! Don’t forget to give me a follow and connect with me on Instagram, Facebook, and Youtube as well, in order to stay up to date with my content.

