Go From 0 To 10 Pull Ups In A Row (FAST!)
Unable to get your chin across that bar? I've got you covered. Here, find a pull up program designed for you, the beginner, that'll take you from 0 to 10 pull ups in a row. And fast!
Pull ups are a great muscle-building exercise. They also look pretty darn cool when you can bang them out effortlessly.
But there’s a reason why so few are able to accomplish this impressive feat of strength and unable to do enough reps to truly maximize the muscle building benefits of pull ups. Today I’ll explain why that is, how to improve it, and then give you a full workout designed to quickly take you from 0, 2, 4, 8 — or wherever you’re at — to 10 pull-ups in a row and beyond.
Looking for a program that'll guide you through, in a step-by-step manner, the best way to master an exercise (beyond pull ups) you've been struggling with for a long time? Stop searching — because you'll find it right here on Built With Science. Every program takes you through the best progression that'll take you from beginner to novice to the master stage, for every exercise (and in the FASTEST time possible). If you’re interested:
Click the button below to take my analysis quiz to discover the best program for you:
↓
Why Are Pull Ups So Hard?
Let’s begin by covering why pull ups are so difficult in the first place.
#1: Your Body Weight
The first reason has to do with your body weight. Under normal circumstances, to improve your strength in an exercise you’d use a weight and rep range that best suits your current strength level and slowly progress from there.
With pull-ups, however, you’re forced to lift your body weight. Whether you weigh 150 or 300 pounds, that’s the weight you’ll have to overcome with each rep. It’s like being forced to use 225 pounds every time you bench press, independent of how strong you actually are. Yet most people disregard this and attempt to increase their pull-ups by, well, trying to do more pull-ups.
For example, if someone can do, let’s say, 5 pull-ups in a row, they’ll likely be able to do:
- 5 in the first set
- 3 in the second set, and then
- 2 in the last set
... for a grand total of just 10 reps.
This is a problem because of two reasons:
- You're essentially training your all-out "max strength" every time you do this. And this has been shown to tax the body quite heavily.
- Worse still, you're not accumulating enough pull up volume needed to improve on the exercise.
#2: Pull Ups Are Not Just A Back Exercise
In addition to this, most people don’t realize that pull ups are not just a back exercise. To properly perform them, several other muscles in your upper and lower body must work together synergistically.
No matter how strong your bigger back muscles or biceps get, if you have weak links in the chain, it will limit you from improving your pull ups. This is why research shows a weak correlation between movements like the lat pulldown and pull up strength. And it’s why many people can get really strong with assisted pull-ups or even chin-ups yet still struggle with pull ups.
Meaning? You need to focus on the weaker, often overlooked muscles that these big exercises don’t train very well. So, how do we solve this?
There are 3 steps to this.
Step 1: Building Strength To Do Pull Ups
The first step is to change the way you train your pull ups so that you’re able to do enough quality volume to make strength improvements. The right approach, however, depends on your strength level.
If you currently can’t do any pull-ups or can’t do more than 4 in a row, then we’re not ready to use pull ups quite yet. Instead, we will use 2 other exercises to quickly build your strength.
Exercise 1: Inverted Rows
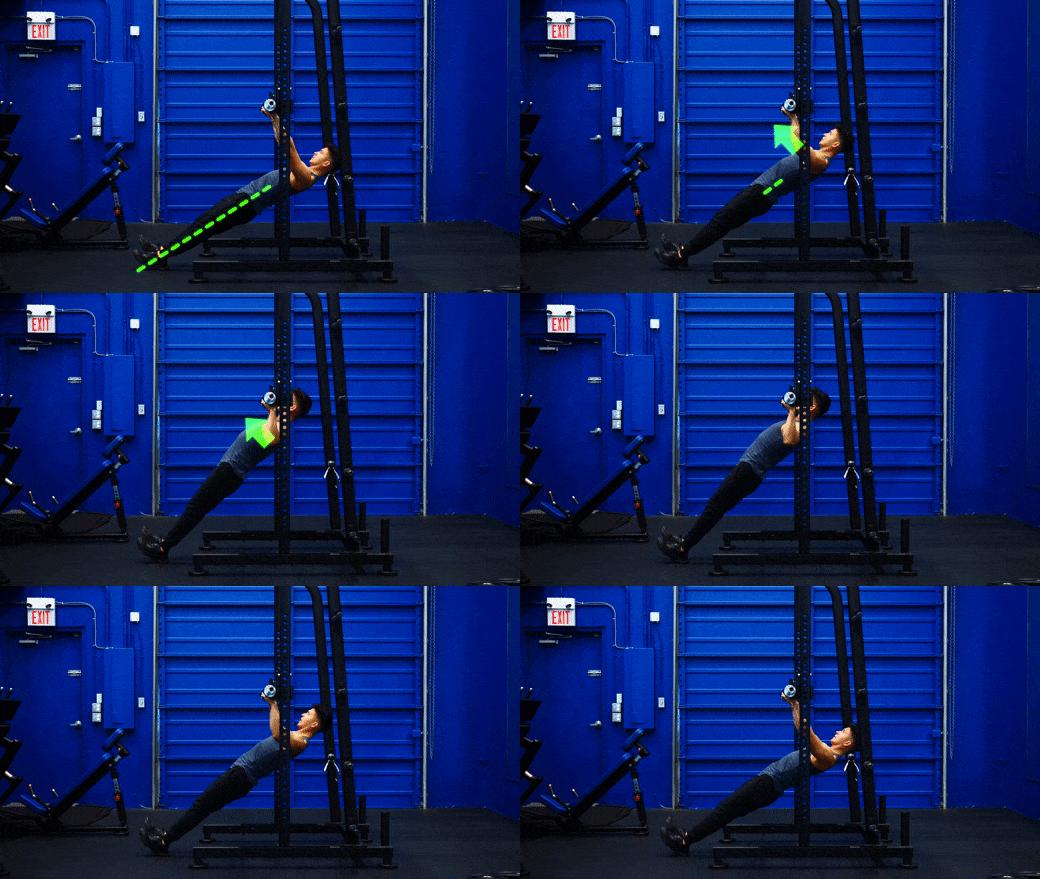
The first exercise will be used for all strength levels but is especially helpful for the 0 to 4 group. With it, by manipulating your body position, you can pull your body weight just like you would in a normal pull-up, but your body won’t have to fight as hard against gravity.
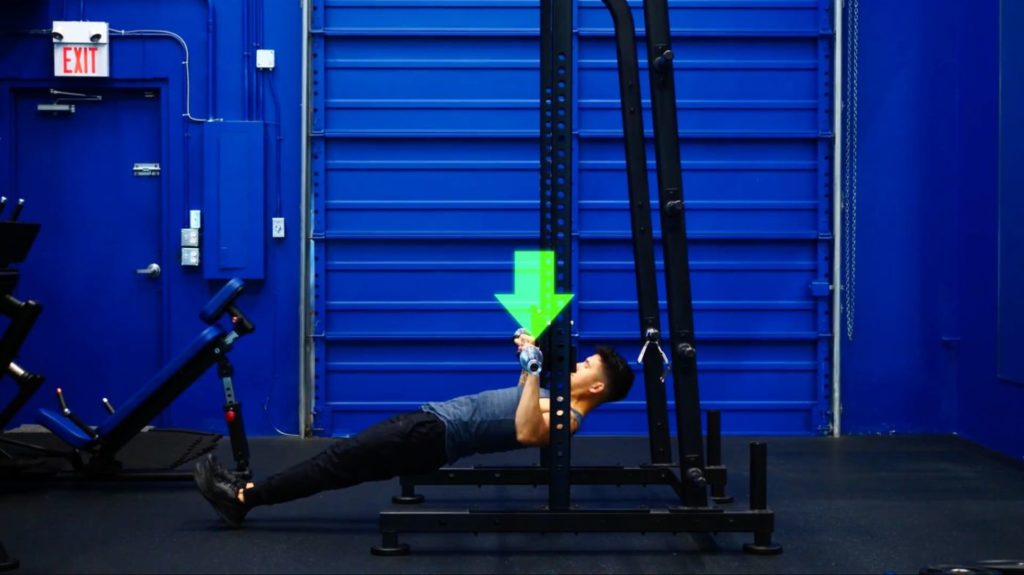
Keep your core engaged, glutes squeezed, and legs straight. Then, pull with your elbows to bring your chest towards the bar.
As you get stronger, lower the rowing angle to make the movement more difficult until you get completely horizontal.
Exercise 2: Assisted Negative Pull Ups
We still however need an exercise that trains your body vertically like the pull up. This is where the second exercise comes in. This exercise takes advantage of the fact that you have considerably more strength during the downward phase of the pull-up as opposed to the way up. To perform it:
- Use a bench or box to assist kick yourself to the top part of the pull up
- From here, hold this position for a few seconds
- Then lower your body as slowly as possible, stopping and spending more time in the most difficult spots where you're the weakest
Work towards a 5 second hold at the top and a total 5 second hold on the way down.
In step 3 of this article, I’ll explain how and when to re-test your pull up strength. But, once you’re able to do between 5 to 7 pull ups in a row, is when you’ll want to then progress your approach.
Progress Once You're Able To Do 5 To 7 Pull Ups In A Row
To start, we’ll use a pull up training philosophy popularized by Pavel Tsatsouline, former trainer of the Soviet Special Forces.
The idea is that we do several sets of pull ups that never allow your body to reach complete failure. The result is a high amount of successful reps (i.e., proper form) that will help your body quickly build strength and learn how to better activate the muscles worked in the pull up exercise.
#1: Do Sets Of Anywhere Between 2 To 5 Reps
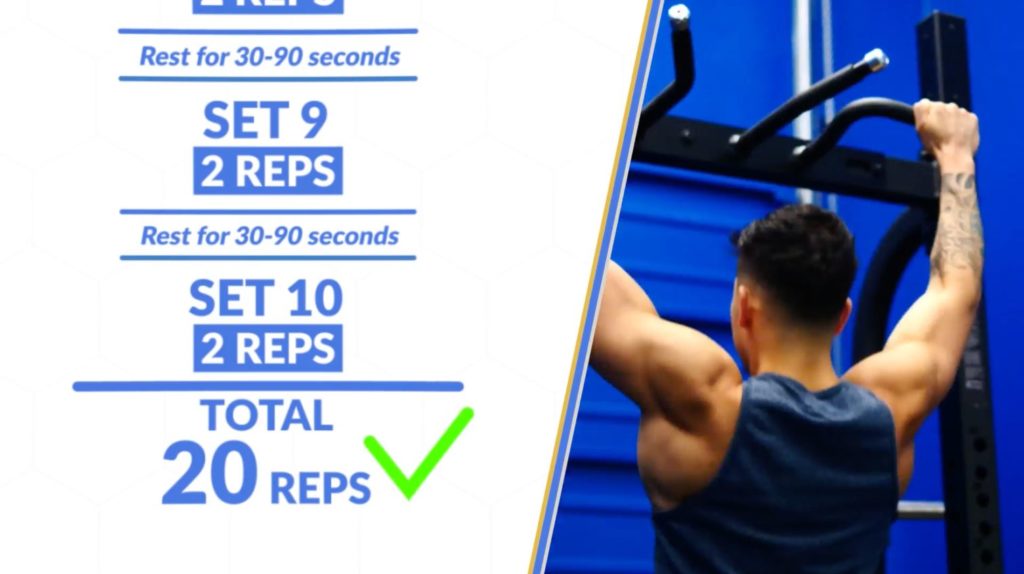
To apply it, you’re going to do sets of anywhere between 2-5 reps. These sets should be at least 2 reps away from your max effort. So if you can do just 5 pull-ups in a row, stick to sets of 2-3 reps to avoid overexertion. You’ll do a set, rest for 30-90 seconds, do another set, and repeat this process until you reach a grand total of 20 reps.
It doesn't matter if this takes you 4 sets or 10 sets to accomplish this. And it also doesn’t matter if you can only do sets of just 1 pull-up by the end of it. The key is that you’re staying away from failure and accumulating those reps. The goal is to overtime comfortably reach a total of 30 reps.
#2: Use Resistance Bands
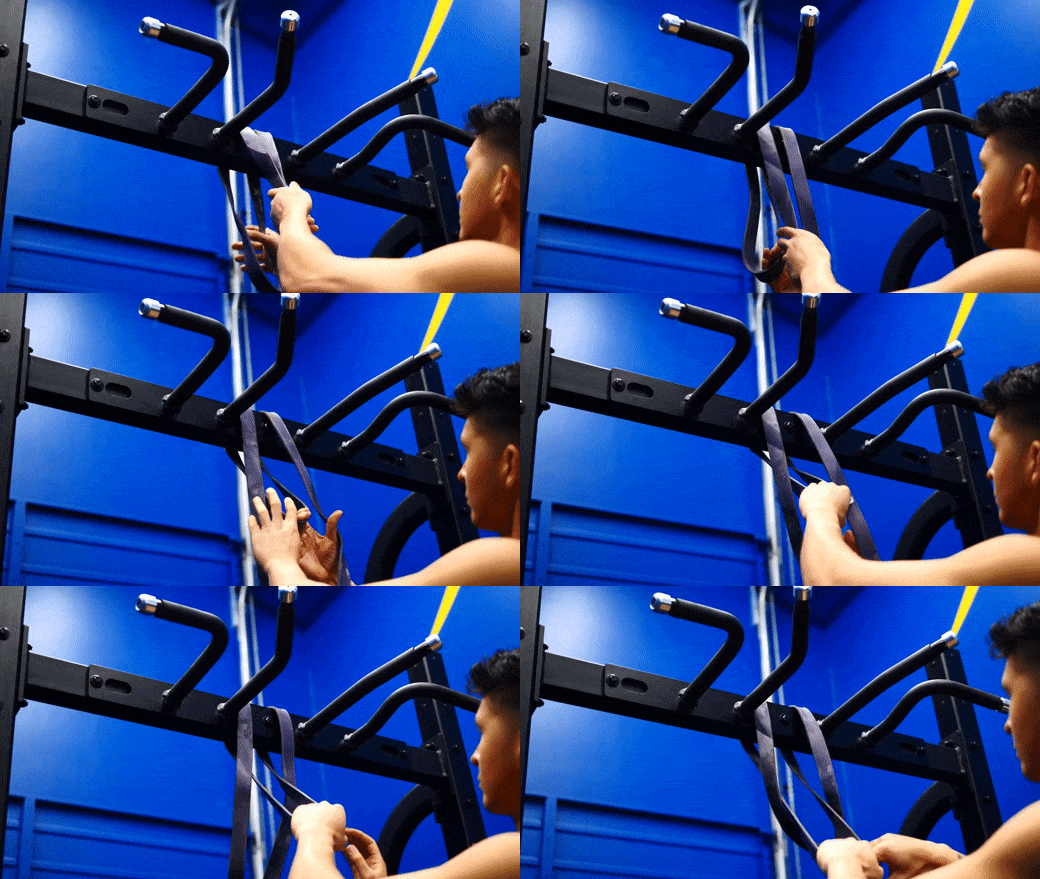
Second thing you’ll do is get yourself a few of these. Loop one around the top of a bar just like this and put your feet into it.
The band will exert force upwards as long as you stand on it, effectively reducing the amount of resistance you need to overcome with each rep. The thicker the band, the easier it will be, so choose one that enables you to do between 6-12 reps.
Wait Jeremy what if I don’t have a band? Well, you can instead use the negative pull-ups I showed earlier. BUT whether you get the bands from me or somewhere else, they are 100% worth the investment. Beyond simply helping to improve your pull ups, these bands are also good for:
- Your mobility AND
- Optimizing resistance curves for different exercises
And trust me, I know how intimidating it might seem to set this up and do this exercise. Especially in the middle of the gym, but it’s going to be one of the most effective ways for you to improve your pull ups. It's also far superior to something like the assisted pull-up machine. I hope that encourages you a little bit, and with that said, let’s move on to the final strength level.
"Add" Difficulty Once You Get To 8 To 9 Reps In A Row
So, once you get to 8-9 reps in a row yet can’t quite break through 10, you’ll simply use the same routine as the 5-7 group — but with more difficulty. For the bodyweight pull ups, add a 5lb weight either with a weight belt or a dumbbell between your feet. For the banded pull-ups, switch to a thinner band or take one foot out to lessen the support.
Step 2: Improving Weakpoints In The Pull Ups
Now that we’ve strengthened the big pulling muscles and practiced the skill of actually doing pull ups, the next step is to improve common weak links in the chain that are likely holding you back. There are 2 muscles in particular that are heavily involved in the pull up, yet tend to become underdeveloped.
Muscle 1: Core
The results of a 2018 research study by Hewit and colleagues helps reveal the importance of the first muscle. Their research team took subjects who could perform more than 10 pull ups in a row and measured the activation of various forces as they performed their pull ups.
It may come as a surprise for many of you but the highest activated muscle, even more than the back and biceps, was the core.
This makes sense. Think about it: with pull ups, you’re essentially doing a mid-air plank and forced to use your core to stabilize your body.
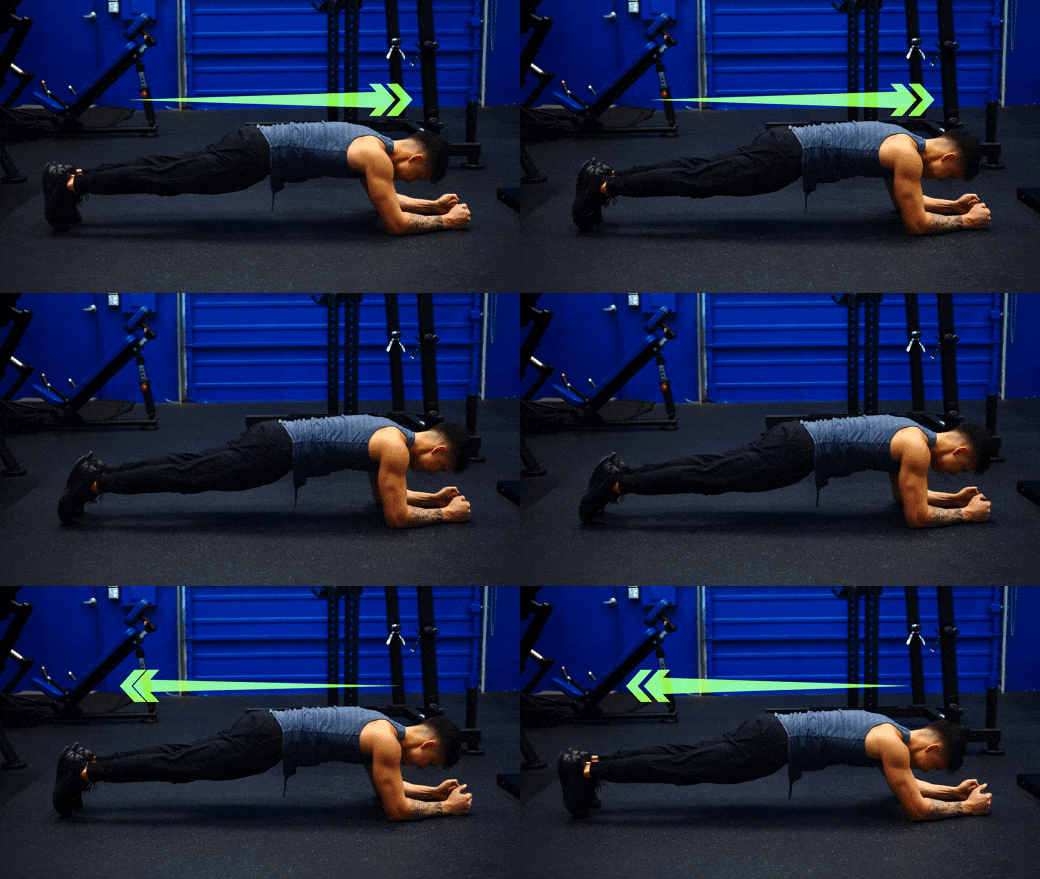
To best replicate the intense demands placed on the core from pull ups, we can use what’s known as a long lever rocking plank. Setup how you would a normal plank but move your arms further up towards your head. Squeeze your glutes and rock your body slowly forward and back.
Let's be real. You'd likely never have suspected the massive role your core has to play in mastering the pull up. And chances are, you're struggling to make headway with another exercise, too. Maybe it's not that you're weak, but that you're working on all the wrong muscles. I.e., you're barking up the wrong tree. Want to avoid wasting time on stuff that won't help you get stronger or build muscle? Then Built With Science programs are just what you need. For more information:
Click the button below to take my analysis quiz to discover the best program for you:
↓
Muscle 2: Lower Traps
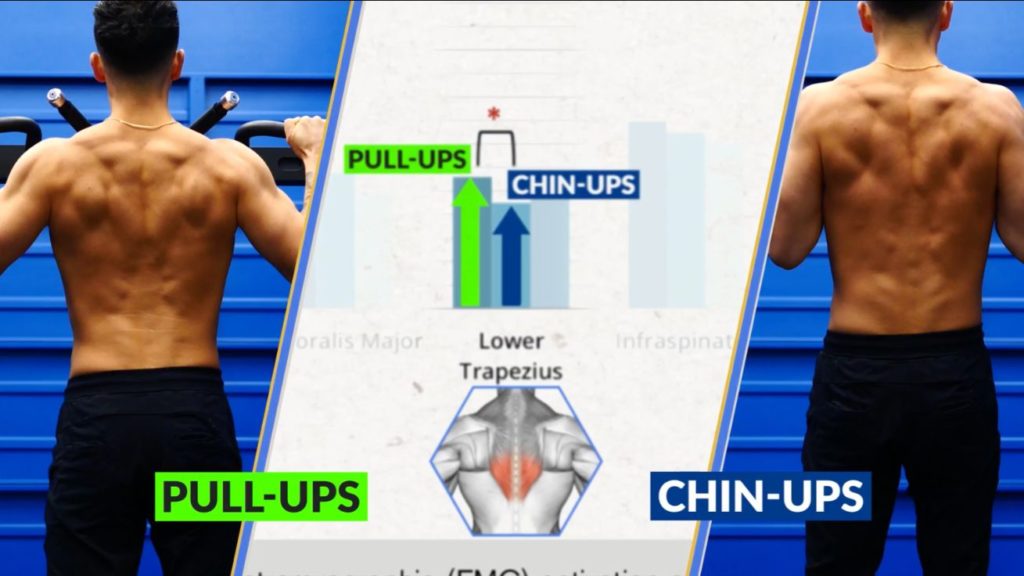
As for the second muscle, its importance is illustrated by this study from the Journal of Strength and Conditioning. The researchers analyzed muscle activation during the pull up but this time compared it to other exercises like the chin-up.
They found that one muscle, the lower traps, was highly active during pull ups — and to a significantly greater degree than during chin-ups.
Since this muscle plays an integral role in stabilizing your shoulder and upper body as you pull, it’s essential that you train it to prevent it from limiting you.
To do so, we’ll use an exercise that looks deceivingly easy until you try it:
- Hang from a bar with your hands shoulder-width apart, feet together, core relaxed, and elbows locked.
- Relax your shoulders and back to let your shoulders come up towards your ears.
- Then, without bending your arms, pull your shoulders down and away from your ears. You should feel this in the middle of your back.
- Pause for 2 seconds at the top position, come back down, and then repeat.
Step 3: Programming Pull Up Progression Program
Alrighty, here’s the game plan.
You’ll first start with the main back exercises based on your current strength level. This will be followed by the core and lower traps exercise we went through.
0-4 Pull Ups
Inverted Row: 4 sets of 8-12 reps
Negative Pull Ups: 5 sets of 5 reps (progress to 5 second descents each rep)
Long Lever Rocking Plank: 3 sets (aim to hold for 60-120 seconds)
Scapular Pull Ups: 3 sets of 8-15 reps (2 second holds at top position)
5-7 Pull Ups
Pull Ups: Sets of 2-5 reps staying 2 reps away from failure (aim for 20-30 reps total)
Banded Pull Ups: 3 sets of 6-12 reps
Inverted Row: 3 sets of 8-12 reps
Long Lever Rocking Plank: 3 sets (aim to hold for 60-120 seconds)
Scapular Pull Ups: 3 sets of 8-15 reps (2 second holds at top position)
8-9 Pull-Ups
Weighted Pull Ups: Sets of 2-5 reps staying 2 reps away from failure (aim for 20-30 reps total)
Banded Pull Ups: 3 sets of 6-12 reps
Inverted Row: 3 sets of 8-12 reps
Long Lever Rocking Plank: 3 sets (aim to hold for 60-120 seconds)
Scapular Pull Ups: 3 sets of 8-15 reps (2 second holds at top position)
How To Incorporate The Pull Up Program Into Your Training
But how you incorporate this workout depends on what your training currently looks like. It can easily be used as a full back workout performed once a week. Or if you train back twice a week, you can plop in a couple of the exercises into each day.
As you use this plan, you’ll also want to re-test your max pull-ups every month and then move on to the next level as your strength improves.
Then, once you go past 10 pull ups in a row, is when you can now enter a whole new level by adding weight to continue maximizing the muscle-building benefits of this exercise.
As for where to download your free workout with all the reps, sets, exercises, and tutorials - just head on over to builtwithscience.com/pullupPDF and I’ll send it right over to you.
As for where to download your free workout with all the reps, sets, exercises, and tutorials - just click the button below and I’ll send it right over to you:
Click the button below to grab your FREE copy of the Pull Up Workout PDF:
↓
Takeaway
Even if you can’t do any pull ups right now, use this workout, stay consistent, and just like countless others have experienced from my past pull up articles (i.e., the four-step pull up progression and science-based tips to increasing pull ups), you’ll be blown away with just how quickly your pull ups increase. That’s the true power of science.
And if you’re looking to apply this science-based approach to the rest of your training to make faster gains and build a body you’re proud of, take my analysis quiz to discover the best step by step program for you and your body:
Click the button below to take my analysis quiz to discover the best program for you:
↓
And one more thing, guys. You’re going to be doing quite a bit of pull ups in no time, so it’s extremely important that you ensure you’re doing them with proper form. You can do so by checking out this past article covering the most common pull up mistakes.
Thanks so much for reading, and I’ll see ya next time!


